


As a new knitter you can pick up bad habits that can hold you back later. Build a solid knitting foundation while making a gorgeous fringed scarf for under $20.
Contents
- Get Your Yarn Ready
- Cast On
- Tension Your Yarn
- The Knit Stitch
- Tips and Tricks
- Avoid Common Knitting Mistakes
- Switch To Another Ball of Yarn
- Bind Off
- Weave In Ends
- Optional: Add Fringe

Crochet is a fast, fun hobby that’s just as addictive as knitting, but understanding how crochet works is tough on your own. We teach you the fundamentals of crochet so that you can approach any project with confidence.
Contents
- Base Chain
- Single Crochet
- Next SC Row
- Examine Single Crochet Row
- Half-Double Crochet
- Double Crochet
- Triple Crochet
- Slip Stitch
- Make Stripes on Crochet
- Sandwich Yarns
- Magic Ring
- Crocheted Flower
- Coffee Cozy Crochet
- Granny Square
- Check Gauge on Crochet
- Crocheted Hat
- Increasing on Crochet
- Decreasing on Crochet
- Fixing Mistakes on Crochet
- Seaming With Crochet
- Decorative Crochet Border
- Weaving in Ends on Crochet

Don’t get stuck knitting just scarves. We teach you every beginner foundational technique so you are ready to knit hats, mittens, and socks in no time. You’ll learn and practice on scarves, dishcloths, washcloths, pillows, and a patchwork blanket.
Contents
- 5 Keys for Beginner Success
- Yarn for Beginner Projects
- Needles for Beginner Projects
- The Long-Tail Cast-On
- Estimating Tail Needed
- Refresher: The Long-Tail Cast-On
- Refresher: 1 Row of Knitting
- How to Do the Purl Stitch
- Forgot to Put the Yarn in Front
- Wrapping Yarn the Wrong Way
- Examining Garter Stitch
- How to Do Ribbing
- Examining Ribbing
- Reading Your Work on Ribbing
- Removing Stitches One By One
- Forgot to Move the Yarn
- Knitted/Purled in Wrong Spot
- Knitted Past a Wrong Stitch
- Going the Wrong Way
- Count Stitches by Fives
- Fixing a Dropped Stitch 4 Ways
- A Dropped Stitch Far Down
- Check Your Tension
- Bind Off in Pattern
- Weave in Ends on 1×1 Rib
- Switching Colors + Carrying Yarn
- Dishcloth: How to Increase
- Dishcloth: Examining First Rows
- Taking Out Rows of Stitches
- Put Stitches Back on the Needles
- Dishcloth: How to Decrease
- How to Do Stockinette Stitch
- How to Make a Gauge Swatch, Check Gauge, and Adjust Needle Size to Get Gauge
- Frog Dishcloth: First Rows
- Frog Dishcloth: Pattern Rows
- Recognize Where You Are
- Weaving in Ends on St St
- Blocking Your Work
- Slip-Stitch Scarf: Slip Stitches
- Slip-Stitch Scarf: First Rows
- Advanced Knit and Purl Mistakes
- Mistake-Rib Scarf: First Rows
- If You Get Lost in the Pattern
- If Stitches Don’t Line Up Right
- How to Do Seed Stitch
- Seed Stitch Dishcloth
- Decreasing on Seed Stitch
- How to Slip Edge Stitches
- Patchwork Blanket: Zig-Zag Lace
- Add a Border to Your Squares
- Seaming With a Crochet Hook
- Mattress Stitch

If you can’t fix mistakes in your knitting, you won’t take risks. These videos show you how to catch and correct the 10 top knitting mistakes so that no misstep can slow you down.
Contents
- Fixing a Dropped Knit Stitch
- Fixing a Dropped Purl Stitch
- Undo Knitting Stitch by Stitch
- Knitting Too Tight
- Twisted Purl Stitches
- Put Dropped Stitches Back On
- Loop Not Pulled Through
- Going the Wrong Way
- Mistakes in Ribbing
- Cast-On/Bind-Off Too Tight

Felting and seaming are two techniques most beginning knitters avoid because they seem scary. Learn how easy they both are on an adorable, instant-gratification project you’ll love.
Contents
- Practice With a Paper Slipper
- Knit in Garter Stitch
- Count Rows on Garter Stitch
- Change Colors Correctly
- Count Rows on Next Squares
- How to Pick Up and Knit
- Mark Your Seams for Success
- Seam with Mattress Stitch
- Fearlessly Weave in Ends
- Fun with Needle Felting
- Add Puffy Paint for Non-Slip

Many knitters knit slower than they need to due to errors in their tension and technique. We teach you to correct those errors so your knitting is smooth and rhythmic and you feel proud of your stitches and tension.
Contents
- Fully Insert Needle-Tips
- Spread Out Right-Hand Stitches
- Advance Left-Hand Stitches
- Hang Onto Your Stitches
- Hang Onto Your Yarn
- Feed Yarn Through Your Fingers
- Learn to Fix Dropped Stitches
- Count Stitches + Rows Fast
- Use the Right Tools for the Job
- Learn to Read Your Work
- Avoid Needless Frogging

When you don’t know how to read knitting patterns, you stay stuck as a beginner. We teach you how to read all kinds of knitting patterns so that any project is within your reach.
Contents
- Why Learn To Read a Pattern
- Guide: How to Read Patterns
- Gauge Matters, Not Needle Size
- Substitute Yarn Fiber + Weight
- Size, Measurements, and Ease

Knitting your first hat can be challenging, especially if you’re using double-pointed needles. We teach you the easiest way to knit in the round on Magic Loop so you can knit a beginner bulky hat with confidence.
Contents
- Learn Magic Loop + Check Gauge
- Cast On
- Start Ribbing
- Ribbing Tips
- Increase Round
- Making (Jogless) Stripes
- Decreases
- Finishing

Lace knitting is intimidating because it can be hard to recognize and fix mistakes. Learn and practice on an elegant feather-and-fan summer scarf so you can feel confident approaching harder lace projects.
Contents
Feather-and-Fan Scarf
- Basic Feather and Fan Pattern
- How to Tell What Row You’re On
- Tell Where You Are in the Row
- Fixing Mistakes and Binding Off
Odyssey Shawl (Joji Locatelli)
- Full Tutorial: Odyssey Shawl

Cables create beautiful, flowing motifs, but using a cable needle can be cumbersome. We teach you with and without a cable needle so you can knit any cabled project FAST. Learn and practice on a gorgeous pair of bulky cabled legwarmers.
Contents
- Cabled Legwarmers Walkthrough
- How to Read a Cable Chart
- Keep Track of Where You Are
- Rows 1-4 (Stockinette Stitch)
- Rows 5-6 (Cable Set-Up)
- Cable Abbreviations
- T3L/T3R With a Cable Needle
- T3L/T3R Without A Cable Needle
- Work Even on a Cable Chart
- Easy 2-Row Buttonhole
- C4R With A Cable Needle
- C4R Without Cable Needle
- Rows 13-24 (Continue Pattern)
- When You Forget to Cable
- Mistakes When Cabling Without a Cable Needle
- A Stitch That Looks Out of Place
- Forgot to Do Buttonhole
- Forgot What Row You’re On
- C4L With A Cable Needle
- C4L Without A Cable Needle
- How to Bind Off in Pattern
- Sew Buttons and Weave in Ends
- How to Make a Twisted-Cord Tie
Bonus Videos
- Reversible Cables
- Cabling Tips

Holding the yarn in your left hand to knit and purl can feel awkward. We help you finally “get” Continental so you can knit faster with better tension.
Contents
- Continental vs. American Knitting
- Continental vs. American Ribbing
- Tensioning the Yarn
- Finger Aerobics I
- The Continental Knit Stitch
- Finger Aerobics II
- The Continental Purl Stitch
- Yarnover
- 1×1 Rib
- Correct Hand Position: The “U”
- How to Knit Without Looking

Knitting in the round using double-pointed needles can slow, difficult, and frustrating.
We teach you our favorite way of knitting in the round: Magic Loop so you can knit socks, sweaters, and hats easily.
Practice on the perfect slouchy hat.
Contents
- Knit in the Round on Magic Loop
- How to Go Faster on Magic Loop
- Keep Your Loops the Right Size
- Switch Needles on Magic Loop
- How to Start with a Purl Stitch
- Pulling the 1st Stitch Too Tight
- Turned Knitting Inside-Out
- Round-End Yarn-Overs
- Going The Wrong Way
- Twisting Loops of Cable
- Undo Knitting Stitch by Stitch
- The “One Stitch Left” Challenge
- The Traveling Loop Technique

Mosaic knitting is a colorwork technique even beginners can do. But the instructions can be confusing. Learn to master Mosaic and slip-stitch techniques to make stunning color projects.
Contents
- Beginner: Mosaic Brick Pattern
- Three Tips for Mosaic Knitting
- Basic Mosaic Troubleshooting
- Intermediate: ZigZag Stripes
- Fixing Intermediate Mistakes
- Advanced: Mosaic Charts
Starburst Cowl (Irina Poludnenko)
- Full Tutorial: Starburst Cowl

If you have hand pain or arthritis, it limits how much you can knit. Portuguese knitting can help reduce hand pain so you can enjoy knitting again.
Contents
- Portuguese Tension + Purl Stitch
- Portuguese Knit Stitch

Most dog sweaters are knit from pieces you seam up, which takes a long time.
Learn the basics of sweater shaping while knitting a great-looking dog sweater without seaming on Magic Loop.
Contents
- Magic Loop + Check Gauge
- Cast On and Work Neck Ribbing
- Work Body Increases
- Bind Off for Leg Openings
- Cast On to Finish Leg Openings
- Weave in Your Ends Now
- Continue Knitting the Body
- Decrease for Back
- Work Body Ribbing
- Work Leg Ribbing and Finish

Most sock patterns are very hard for beginners, especially if they are written for double-pointed needles.
Our class teaches you the easiest techniques using Magic Loop. You will knit a simple pair of worsted-weight toe-up socks that fit great.
Contents
- Walk-Through of Toe-Up Sock
- Check Your Gauge in the Round
- Judy’s Magic Cast-On (JMCO)
- Cast On for Both Socks
- Stop Losing Cast-On Stitches
- Bottom Needle/Back Needle
- Fix a Loose Toe-Up Cast-On
- Increases on Toe-Up Socks
- M1L and M1R Increases
- Easier KFB Instead of M1R
- Read Your Work for Increases
- Keep Yarn from Tangling
- Avoiding Gaps and Ladders
- Socks Not Joined On One Side
- Removing Socks to Unravel + Fix
- Start Fleegle Heel Increases
- Estimate Fleegle Heel Using Shoe Size
- Turn the Fleegle Heel
- How to Purl Backwards
- Final Decreases on Fleegle Heel
- Invisible Ribbed Bind-Off
- Jeny’s Surprisingly Stretchy Bind-Off
- Weave in Ends
Bonus videos
- Faux Heel Flap for Toe-Up Socks
- Slip-Stitch Heel Pattern
- Eye-of-the-Partridge Stitch

Top-down socks have several complex parts.
Learn to knit a pair of top-down fingering-weight socks with our simple Magic Loop pattern so that you can knit even advanced socks with confidence.
Contents
- Top-Down Socks Walk-Through
- Two-at-a-Time Cast-On
- Knit 1st Round
- Optional Lace Pattern
- Keep Yarn from Tangling
- Avoiding Gaps and Ladders
- Socks Not Joined On One Side
- Knit the Heel Flap
- Slip-Stitch Heel Pattern
- Eye-of-the-Partridge Stitch
- Turn the Heel
- How to Purl Backwards
- Pick Up Stitches Along Heel Flap
- Shape Gusset
- Kitchener Stitch
- Weave in Ends on Socks
- How to Block Your Work

One-and-two-color Brioche knitting is beautiful but can be intimidating.
We teach you every tip and trick so that knitting Brioche feels like second nature. Practice on a gorgeous scarf and hat.
Contents
- Basic One-Color Brioche Stitch
- Read Your Work in Brioche
- How to Count Stitches and Rows
- Setup for a Standard Bind-Off
- Stretchy Yarnover Bind-Off
- Weaving in Ends on Brioche
- What is Selvedge-Stitch Brioche?
- Italian Cast-On + Tubular Setup
- One-Color Selvedge Brioche
- Italian Bind-Off
- One-Color Brioche in the Round
- Two-Color Brioche in the Round
- Read Work on 2-Color Brioche
- Decreasing: the Brioche SSK
- Two-Color Flat Selvedge Brioche
- Tips for Two-Color Flat Brioche
- Fixing Mistakes in Brioche

Charts allow you to knit complex patterns easily, but their symbols and rules can be confusing.
We teach you knit-and-purl, lace, cable, Fair-Isle, Intarsia, double knitting, duplicate stitch, and Mosaic charts so that you can approach any charted pattern, and any of the above projects, with confidence.
Contents
Knit and Purl Charts
- Basic Checkerboard
- Textured Stripes
- Bricks
- Swan
Lace Charts
- Lace Zigzag + Put in a Lifeline
- Lace Diamond
- Foliage Toddler Hat
- Starlight Lace in the Round
Colorwork Charts
- Fair Isle Charts
- Double Knitting Charts
- Intarsia Charts
- Duplicate Stitch
- Mosaic Charts
Cable Charts
- Simple Cable Charts
- Complex Cable Charts

Two-sided knitting involves specific new knitting techniques.
Master double knitting from a chart so that even complex projects, like the above, are doable.
You’ll learn by making a chunky heart or checkerboard scarf.
Contents
- Pattern Walk-Through
- How to Read a Chart
- Cast-On for Double Knitting
- Set-Up for Double Knitting
- Double-Knit Plain Stitches
- Practice: Rows 3-4
- Keep Your Edges Clean
- Double Knit a Charted Design
- Keep Track on Double Knitting
- Practicing the Charted Design
- How to Undo Stitches
- If You Don’t Move Both Yarns
- Fixing a Mistake Far Down
- Completely Remove a Few Rows
- Keep Your Yarn from Twisting
- Adding a New Ball of Yarn
- How to Double-Knit Faster
- How to Bind Off
- How to Weave In Ends

Grab 2, 3, or more colors of yarn because you’re ready to knit Fair-Isle.
Fair-Isle tension can be tricky, so we walk you through it whether you’re an American, Continental, or dual-style knitter.
Practice on a fun and easy felted bag.
Contents
Beginner: Fair-Isle Felted Bag
- Pattern Walkthrough
- Knitting the Base of the Bag
- Join Color B
- Knit the Striped Bag Bottom
- Pick Up + Knit Around Base
- Begin Knitting in the Round
- Learn to Read a Chart
- Begin Fair-Isle Knitting
- Messed Up Following the Chart
- Maintain Tension
- Pulling Floats Too Tight
- Fix Mistakes Far Down
- Switch Colors Consistently
- Prevent Long Floats
- Avoid Corners on Magic Loop
- Garter Stitch in the Round
- Final Rounds
- Weave in Ends
- I-Cord Handles
- Assemble Bag
Intermediate and Advanced Fair-Isle
- Flat Fair-Isle (Back-and-Forth)
- 3-Color Fair-Isle
- Fair-Isle Ribbing
- Ladder-Back Jacquard

Cat Bordhi created the popular infinity-loop knitting style called Moebius Knitting.
Get comfortable knitting any moebius project out there by creating a gorgeous decorative felted bowl.
Contents
- Materials
- Moebius Cast On
- Creating 5 Twists
- Round 1
- Round 2
- I-Cord Bind-Off
- Weave in Ends
- Prepare Folds
- Pick Up and Knit
- Increase Round
- Decreases
- Decrease Tricks
- Finishing

Learn to knit charted lace in the round, fix mistakes on any kind of lace pattern, and knit a beautiful hat you will be proud of.
Contents
- Pattern Overview
- Learn Magic Loop
- Check Your Gauge
- Cast-On and Round 1
- Work Rounds 2-3
- Crown – Rounds 1-2
- Crown – Rounds 3-4
- Counting Chart Stitches
- Crown – Round 5
- Pattern Round or Plain Round?
- Fixing Mistakes 1
- Crown – Round 9
- Crown – Round 7
- Crown – Round 11
- Fixing Mistakes 2
- Remove Stitches Back to Lifeline
- How to Put in a Lifeline
- Crown – Round 13
- Crown – Round 15
- Fixing Extreme Mistakes
- Loop of Magic Loop Comes Out
- Forgot a Yarnover
- Decrease Round
- Leaf Lace – Rounds 1-2
- Leaf Lace – Round 3
- Leaf Lace – Round 5
- Dropped Yarnovers
- Leaf Lace – Round 7
- Leaf Lace – Round 11
- Leaf Lace – Round 9
- Fixing Mistakes 3
- Work in Ribbing
- Jeny’s Surprisingly Stretchy Bind-Off
- Invisible Ribbed Bind-Off
- Weave In Ends

Normal thumb construction makes your first mittens a challenge.
Learn the world’s best mitten thumb plus the two-at-a-time-on-Magic-Loop technique to create a pair of perfect-fitting bulky mittens that you can knit in one day.
Contents
- Bulky Mittens Pattern Overview
- Two-at-a-Time Cast-On
- Twisted Rib Cuff
- Work in Twisted Rib
- Count Cuff Rounds Easily
- Keep Yarn from Tangling
- Work One Round Even
- Increase for the Hand
- Increase for the Thumb
- Slip Markers As You Increase
- Continue Increasing for Thumb
- Tell If It’s Time to Increase
- Remove Thumb Stitches
- Knit the Hand
- Count Your Rounds Easily
- Decrease for Top of Hand
- Count Subsequent Rounds
- Finish Hand Decreases
- Finish Top of the Hand
- Place Thumb Stitches on Needle
- Pick Up + Knit Across Gap
- Knit Thumb
- Weave in Ends on Mittens
- Bonus: Ultimate Mitten Thumb

Using the same standard bind-off for every project can make your knits look lackluster.
For a professional finish, select a recommended bind-off for each type of project from over 45+ bind-offs.
Contents
Bind-Off Tips and Tricks
- Matching Cast-Ons + Bind-Offs
- Neaten Last Stitch: Flat Knitting
- Neaten Last Stitch in the Round
- Count Bound-Off Stitches
- Undo Your Bind-Off Stitches
Bind-Offs for Stockinette
- Standard Bind-Off
- Suspended Bind-Off (Variation)
- Decrease Bind-Off
- Crochet Bind-Off
- Elastic Bind-Off
- Braided Rib Bind-Off
- EZ Sewn Bind-Off
Bind-Offs for Garter Stitch
- Icelandic Bind-Off
- Chinese Waitress Bind-Off
Stretchy Bind-Offs/Bind-Offs for Ribbing
- In-Pattern Bind-Off for 1×1 Rib
- Jeny’s Surprisingly Stretchy Bind-Off (JSSBO): 1×1 Rib
- Jeny’s Surprisingly Stretchy Bind-Off (JSSBO): 2×2 Rib
- Yarnover Bind-Off
- Latvian Bind-Off
- Invisible Ribbed Bind-Off: 1×1 Rib
- Tubular Bind-Off for 1×1 Rib
- Kitchener Double-Rib Bind-Off
- Cable Bind-Off for 1×1 Rib
- Cable Bind-Off for 2×2 Rib
Bind-Offs for Lace
- Frilled Standard Bind-Off
- Jeny’s Surprisingly Stretchy Bind-Off (JSSBO)
Decorative Bind-Offs
- Knit 2 Together Bind-Off
- I-Cord Bind-Off
- Edging Bind-Off
- Hemmed Edge Bind-Off: Purl + Picot
- Frilled Standard Bind-Off
- Frilled Decrease Bind-Off
- Ruffle Bind-Off
- Picot Point Bind-Off #1
- Picot Point Bind-Off #2
- Picot Chain Bind-Off
Seaming Bind-Offs
- Russian Grafting
- Japanese Bind-Off
- ZigZag (Ancient Greek) Bind-Off
- Three-Needle Bind-Off
- Three-Needle I-Cord Bind-Off
- Kitchener Stitch Without Fear
- Kitchener Stitch for Garter Stitch
Other Bind-Offs
- Without-Knitting Bind-Off
- 1-Over-2 (Gathered) Bind-Off
- Cable Bind-Off for Seed Stitch
- Simple Two-Color Bind-Off
- Double-Stitch Bind-Off
- Sloped Bind-Off
- Tulips Buttonhole

Using just one or two cast-ons can make your projects look homemade, not professional.
Learn 40 unique ways to start your knitted projects, with stretchy cast-ons, invisible cast-ons, center-start cast-ons, and more.
Contents
Cast-On Basics
- Estimating Tail Needed
- How to Make a Slipknot
- Casting On Without a Slipknot
- Slingshot Position
Cast-On Tips and Tricks
- Casting Onto Two Needles
- The Infinite-Tail Method
- Count Cast-On Stitches Fast
- Adding More Stitches at the Endl
- Fixing a Dropped Cast-On Stitch
- Cast-On Too Tight or Too Loose
Long-Tail Cast-Ons
- The Long-Tail Cast-On
- Long-Tail Cast-On – Thumb
- Old Norwegian (Twisted German) Cast-On
- Chain (Crochet) Cast-On
Short-Tail Cast-Ons
- Backwards Loop Cast-On
- Cable Cast-On
- Double-Twist Loop Cast-On
- Grandma’s Cast-On
- Knitted Cast-On
- Purled Cast-On
Stretchy/Ribbed Cast-Ons
- Alternating Cable Cast-On
- Alternating Long-Tail Cast-On
- Alternating Old Norwegian (Twisted German) Cast-On
- Channel Island Cast-On
- Chinese Waitress Cast-On
- Double-Start Cast-On
- Slipknot Cast-On
- Tillybuddy’s Cast-On
Invisible Ribbed Cast-Ons
- Italian Tubular for 1×1 Rib
- Italian Tubular for 2×2 Rib
Center-Start Cast-Ons
- Emily Ocker’s Circular Cast-On
- Invisible Circular Cast-On
- Garter Tab Cast-On
Decorative Cast-Ons
- Lace Cast-On
- Picot Cast-On
- Hemmed Edge: Purl + Picot
- I-Cord Cast-On
Double-Sided Cast-Ons
- Judy’s Magic Cast-On (JMCO)
- JMCO for two-at-a-Time
- Turkish Cast-On
- Figure-8 Cast-On
Color Cast-Ons
- Contrasting-Color Cast-On
- Two-Color Cast-On
- Three-Color Cast-On
- Twined Cast-On for 2-Color Rib
Provisional Cast-Ons
- Provisional Cast-On
- Crochet Provisional Cast-On
Special Shapes
- Moebius Cast-On
- Two-at-a-Time Cast-On

If you haven’t crocheted in a while (or ever), you’ll need a quick-reference dictionary of crochet stitches in order to follow any pattern.
Videos and GIFs teach and quickly remind you of each technique.
Contents
- BLO – Back loop only
- CH – Chain stitch | GIF
- DC – Double crochet
- HDC – Half-double crochet
- SC – Single crochet | GIF
- SL ST – Slip stitch
- TR – Triple crochet
- British Crochet Terms

Baffled by an abbreviation in your pattern? Video demos of 30+ abbreviations help you knit any pattern correctly and easily.
Contents
- 1×1 Rib/2×2 Rib – Ribbing
- BLCO – Backwards Loop Cast-On
- BO – Bind Off
- BO in Pattern
- Garter St – Garter Stitch
- K – Knit Stitch – American
- K – Knit Stitch – Continental
- K2TOG – Knit 2 Together
- K2TOGTBL – K2TOG Through the Back Loops
- KFB – Knit Front and Back
- Kitchener Stitch
- Long-Tail Cast-On
- Mattress Stitch
- M1/M1L – Make One Left
- M1R – Make One Right
- P – Purl Stitch – American
- P – Purl Stitch – Continental
- P2TOG – Purl 2 Together
- PFB – Purl Front and Back
- P/u (Pu) + K – Pick up and Knit
- Recognizing Knit + Purl Stitches
- S2KP – Slip 2, Knit, Pass
- SKP – Slip, Knit, Pass
- Sl – Slip 1
- SSK – Slip, Slip, Knit
- St St – Stockinette Stitch
- TBL – Through the Back Loop
- W&T – Wrap and Turn
- Weave in Ends
- Work Even
- YO – Yarnover

Knitting lingo can be confusing.
We define and illustrate over 80 knitting and yarn terms so that you can keep up with any pattern or discussion.
Contents
- Accidental Yarnover
- American/English-Style Knitting
- Aran
- Back Loop
- Beginning of Round
- Bind Off
- Blocking
- Bobbin
- Cast On
- Center-Pull Ball
- Chunky
- Circs/Circulars
- Circular Needles
- Colorway
- Colorwork
- Continental Knitting
- Contrasting Color
- Decrease
- DK
- Double-Pointed Needles
- DPN(s)
- Dye Lot
- Felting
- Fingering
- Flat Knitting
- Frogging
- Garter Stitch
- Gauge
- Gauge Swatch
- Getting Gauge
- Grabby
- Hank
- Heathered
- Highly Variegated
- In Pattern
- In the Round
- Increase
- Kettle-Dyed
- Knit Up (Verb)
- Knitting Flat
- Knitting Pattern
- Knitwise
- Lace
- Leg
- Local Yarn Store
- LYS
- Magic Loop
- Main Color
- Mosaic Knitting
- Multiple (Noun)
- Pull From the Center
- Pull From the Outside
- Purlwise
- Read Your Work
- Reverse Stockinette Stitch
- Ribbing
- Right Side
- Round (Noun)
- Round Knitting
- Self-Striping
- Semi-Solid
- Short-Tail Cast-On
- Skein
- Sport
- Stash
- Stitch
- Stockinette Stitch
- Straight Needles
- Super-Bulky
- Swatch
- Tail
- Tension (Verb and Noun)
- Tink
- Turn Work
- Variegated
- Weave In
- Weight
- Work Even
- Working Yarn
- Worsted
- Wrap
- Wrong Side
- Yardage
- Yarnover

When you’re just starting out it’s hard to know which supplies are essential and which are nice-to-have.
Our list of recommended supplies will help you choose yarn, needles, project bags, and notions for every budget.
Contents
Books
- A Treasury of Knitting Patterns
- Complete Idiot’s Guide to Knitting and Crocheting
- Custom Knits
- Handknit Holidays
- Harmony Guides: Knit & Purl
- Harmony Guides: Lace & Eyelets
- Knitting Brioche
- Knitting on the Edge
- Mosaic Knitting
- Son of Stitch ‘n Bitch
- Stitch ‘n Bitch Crochet – The Happy Hooker
- Stitch ‘n Bitch Nation
- Stitch ‘n Bitch: The Knitter’s Handbook
- The Knitter’s Book of Yarn
- The Magic Loop
Fabric Care
- Blocking Mats and T-Pins
- Soak Wash
- Sock Blockers
- Sweater Shavers
Needles
- 10-Inch Rosewood Needles
- 10-Inch Signature Needles
- Addi Turbos
- Size 10 Birch Needles
Notions
- Ball Winder
- Cable Needles
- Crochet Hooks
- Embroidery Scissors
- Fabric (Puffy) Paint
- Kitchen Scale
- Knit Chek Gauge-Checker
- Knitting Needle Case
- Needle-Felting Needles
- Needle-Felting Pad
- Notions Case
- Pompom Maker
- Stitch Markers – Locking
- Stitch Markers – Split Ring
- Suede Slipper Bottoms
- Swift
- Tape Measure
- Tapestry Needles
Yarn
- Hand Dyed Bulky
- Malabrigo Chunky
- Malabrigo Rasta
- Malabrigo Twist
- Walkabout Yarn
- Wool-Ease Thick n’ Quick Yarn

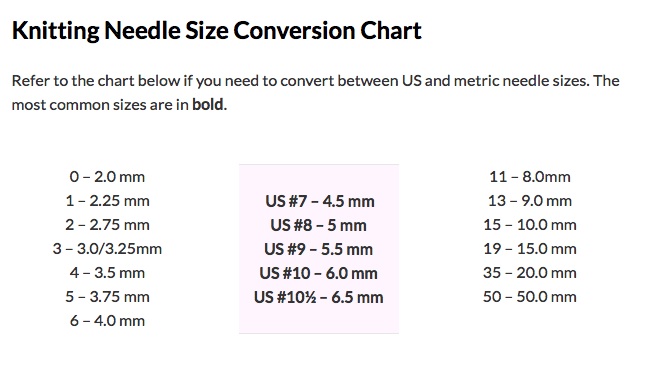
Remind yourself about yarn weights, needle sizes, and gauge with our handy guides..
Contents
- US-Metric Needle Conversion
- Yarn Weights, Needles + Gauge
- Yarn Weights: Actual Size
- Yarn Weights: Photo Glossary


1. Click "Get Instant Access"
Pay as-you-go with Monthly or get all current and future classes (plus downloads) with Lifetime.

2. Start learning right away
Your bonus PDF will walk you through which classes to start with based on your ability level and aspirations.

3. Celebrate how far you've come
Post a photo in our group and bask in the Likes, "Wows," and "Congratulations!" from fellow KnitFreedom students.

1. Click to Get Instant Access
Choose between pay-as-you-go monthly and big-savings Lifetime (includes video downloads for offline viewing).

2. Start learning right away
You'll receive a short bonus PDF walking you through where to start based on your ability level and aspirations.

3. Celebrate your success
Post a photo in our group and bask in the Likes, "Wows," and "Congratulations!" from fellow KnitFreedom students.

1. Click to get instant access
Choose between pay-as-you-go monthly and big-savings Lifetime (includes video downloads for offline viewing).

2. Start learning right away
You'll receive a short bonus PDF walking you through where to start based on your ability level and aspirations.
3. Celebrate your success
Post in our group and bask in the Likes, "Wows," and "Congratulations!" from fellow KnitFreedom students.

1. Click to get instant access
Choose between pay-as-you-go monthly and big-savings Lifetime (+ video downloads for offline).
2. Start learning right away
You'll receive a short bonus PDF walking you through where to start based on your ability level and aspirations.
3. Celebrate how far you've come
Post in our group and bask in the Likes, "Wows," and "Congratulations!" from fellow KnitFreedom students.
1. Click to get instant access
Choose between pay-as-you-go monthly and big-savings Lifetime (includes video downloads for offline viewing).
2. Start learning right away
You'll receive a short bonus PDF walking you through where to start based on your ability level and aspirations.
3. Celebrate how far you've come
Post in our group and bask in the Likes, "Wows," and "Congratulations!" from fellow KnitFreedom students.
As a new knitter you can pick up bad habits that can hold you back later. Build a solid knitting foundation while making a gorgeous fringed scarf for under $20.
Contents
- Get Your Yarn Ready
- Cast On
- Tension Your Yarn
- The Knit Stitch
- Tips and Tricks
- Avoid Common Knitting Mistakes
- Switch To Another Ball of Yarn
- Bind Off
- Weave In Ends
- Optional: Add Fringe
Crochet is a fast, fun hobby that’s just as addictive as knitting, but understanding how crochet works is tough on your own. We teach you the fundamentals of crochet so that you can approach any project with confidence.
Contents
- Base Chain
- Single Crochet
- Next SC Row
- Examine Single Crochet Row
- Half-Double Crochet
- Double Crochet
- Triple Crochet
- Slip Stitch
- Make Stripes on Crochet
- Sandwich Yarns
- Magic Ring
- Crocheted Flower
- Coffee Cozy Crochet
- Granny Square
- Check Gauge on Crochet
- Crocheted Hat
- Increasing on Crochet
- Decreasing on Crochet
- Fixing Mistakes on Crochet
- Seaming With Crochet
- Decorative Crochet Border
- Weaving in Ends on Crochet
Don’t get stuck knitting just scarves. We teach you every beginner foundational technique so you are ready to knit hats, mittens, and socks in no time. You’ll learn and practice on scarves, dishcloths, washcloths, pillows, and a patchwork blanket.
Contents
- 5 Keys for Beginner Success
- Yarn for Beginner Projects
- Needles for Beginner Projects
- The Long-Tail Cast-On
- Estimating Tail Needed
- Refresher: The Long-Tail Cast-On
- Refresher: 1 Row of Knitting
- How to Do the Purl Stitch
- Forgot to Put the Yarn in Front
- Wrapping Yarn the Wrong Way
- Examining Garter Stitch
- How to Do Ribbing
- Examining Ribbing
- Reading Your Work on Ribbing
- Removing Stitches One By One
- Forgot to Move the Yarn
- Knitted/Purled in Wrong Spot
- Knitted Past a Wrong Stitch
- Going the Wrong Way
- Count Stitches by Fives
- Fixing a Dropped Stitch 4 Ways
- A Dropped Stitch Far Down
- Check Your Tension
- Bind Off in Pattern
- Weave in Ends on 1×1 Rib
- Switching Colors + Carrying Yarn
- Dishcloth: How to Increase
- Dishcloth: Examining First Rows
- Taking Out Rows of Stitches
- Put Stitches Back on the Needles
- Dishcloth: How to Decrease
- How to Do Stockinette Stitch
- How to Make a Gauge Swatch, Check Gauge, and Adjust Needle Size to Get Gauge
- Frog Dishcloth: First Rows
- Frog Dishcloth: Pattern Rows
- Recognize Where You Are
- Weaving in Ends on St St
- Blocking Your Work
- Slip-Stitch Scarf: Slip Stitches
- Slip-Stitch Scarf: First Rows
- Advanced Knit and Purl Mistakes
- Mistake-Rib Scarf: First Rows
- If You Get Lost in the Pattern
- If Stitches Don’t Line Up Right
- How to Do Seed Stitch
- Seed Stitch Dishcloth
- Decreasing on Seed Stitch
- How to Slip Edge Stitches
- Patchwork Blanket: Zig-Zag Lace
- Add a Border to Your Squares
- Seaming With a Crochet Hook
- Mattress Stitch
If you can’t fix mistakes in your knitting, you won’t take risks. These videos show you how to catch and correct the 10 top knitting mistakes so that no misstep can slow you down.
Contents
- Fixing a Dropped Knit Stitch
- Fixing a Dropped Purl Stitch
- Undo Knitting Stitch by Stitch
- Knitting Too Tight
- Twisted Purl Stitches
- Put Dropped Stitches Back On
- Loop Not Pulled Through
- Going the Wrong Way
- Mistakes in Ribbing
- Cast-On/Bind-Off Too Tight
Felting and seaming are two techniques most beginning knitters avoid because they seem scary. Learn how easy they both are on an adorable, instant-gratification project you’ll love.
Contents
- Practice With a Paper Slipper
- Knit in Garter Stitch
- Count Rows on Garter Stitch
- Change Colors Correctly
- Count Rows on Next Squares
- How to Pick Up and Knit
- Mark Your Seams for Success
- Seam with Mattress Stitch
- Fearlessly Weave in Ends
- Fun with Needle Felting
- Add Puffy Paint for Non-Slip
Many knitters knit slower than they need to due to errors in their tension and technique. We teach you to correct those errors so your knitting is smooth and rhythmic and you feel proud of your stitches and tension.
Contents
- Fully Insert Needle-Tips
- Spread Out Right-Hand Stitches
- Advance Left-Hand Stitches
- Hang Onto Your Stitches
- Hang Onto Your Yarn
- Feed Yarn Through Your Fingers
- Learn to Fix Dropped Stitches
- Count Stitches + Rows Fast
- Use the Right Tools for the Job
- Learn to Read Your Work
- Avoid Needless Frogging
When you don’t know how to read knitting patterns, you stay stuck as a beginner. We teach you how to read all kinds of knitting patterns so that any project is within your reach.
Contents
- Why Learn To Read a Pattern
- Guide: How to Read Patterns
- Gauge Matters, Not Needle Size
- Substitute Yarn Fiber + Weight
- Size, Measurements, and Ease
Knitting your first hat can be challenging, especially if you’re using double-pointed needles. We teach you the easiest way to knit in the round on Magic Loop so you can knit a beginner bulky hat with confidence.
Contents
- Learn Magic Loop + Check Gauge
- Cast On
- Start Ribbing
- Ribbing Tips
- Increase Round
- Making (Jogless) Stripes
- Decreases
- Finishing
Lace knitting is intimidating because it can be hard to recognize and fix mistakes. Learn and practice on an elegant feather-and-fan summer scarf so you can feel confident approaching harder lace projects.
Contents
Feather-and-Fan Scarf
- Basic Feather and Fan Pattern
- How to Tell What Row You’re On
- Tell Where You Are in the Row
- Fixing Mistakes and Binding Off
Odyssey Shawl (Joji Locatelli)
- Full Tutorial: Odyssey Shawl
Cables create beautiful, flowing motifs, but using a cable needle can be cumbersome. We teach you with and without a cable needle so you can knit any cabled project FAST. Learn and practice on a gorgeous pair of bulky cabled legwarmers.
Contents
- Cabled Legwarmers Walkthrough
- How to Read a Cable Chart
- Keep Track of Where You Are
- Rows 1-4 (Stockinette Stitch)
- Rows 5-6 (Cable Set-Up)
- Cable Abbreviations
- T3L/T3R With a Cable Needle
- T3L/T3R Without A Cable Needle
- Work Even on a Cable Chart
- Easy 2-Row Buttonhole
- C4R With A Cable Needle
- C4R Without Cable Needle
- Rows 13-24 (Continue Pattern)
- When You Forget to Cable
- Mistakes When Cabling Without a Cable Needle
- A Stitch That Looks Out of Place
- Forgot to Do Buttonhole
- Forgot What Row You’re On
- C4L With A Cable Needle
- C4L Without A Cable Needle
- How to Bind Off in Pattern
- Sew Buttons and Weave in Ends
- How to Make a Twisted-Cord Tie
Bonus Videos
- Reversible Cables
- Cabling Tips
Holding the yarn in your left hand to knit and purl can feel awkward. We help you finally “get” Continental so you can knit faster with better tension.
Contents
- Continental vs. American Knitting
- Continental vs. American Ribbing
- Tensioning the Yarn
- Finger Aerobics I
- The Continental Knit Stitch
- Finger Aerobics II
- The Continental Purl Stitch
- Yarnover
- 1×1 Rib
- Correct Hand Position: The “U”
- How to Knit Without Looking
Knitting in the round using double-pointed needles can slow, difficult, and frustrating.
We teach you our favorite way of knitting in the round: Magic Loop so you can knit socks, sweaters, and hats easily.
Practice on the perfect slouchy hat.
Contents
- Knit in the Round on Magic Loop
- How to Go Faster on Magic Loop
- Keep Your Loops the Right Size
- Switch Needles on Magic Loop
- How to Start with a Purl Stitch
- Pulling the 1st Stitch Too Tight
- Turned Knitting Inside-Out
- Round-End Yarn-Overs
- Going The Wrong Way
- Twisting Loops of Cable
- Undo Knitting Stitch by Stitch
- The “One Stitch Left” Challenge
- The Traveling Loop Technique
Mosaic knitting is a colorwork technique even beginners can do. But the instructions can be confusing. Learn to master Mosaic and slip-stitch techniques to make stunning color projects.
Contents
- Beginner: Mosaic Brick Pattern
- Three Tips for Mosaic Knitting
- Basic Mosaic Troubleshooting
- Intermediate: ZigZag Stripes
- Fixing Intermediate Mistakes
- Advanced: Mosaic Charts
Starburst Cowl (Irina Poludnenko)
- Full Tutorial: Starburst Cowl
If you have hand pain or arthritis, it limits how much you can knit. Portuguese knitting can help reduce hand pain so you can enjoy knitting again.
Contents
- Portuguese Tension + Purl Stitch
- Portuguese Knit Stitch
Most dog sweaters are knit from pieces you seam up, which takes a long time.
Learn the basics of sweater shaping while knitting a great-looking dog sweater without seaming on Magic Loop.
Contents
- Magic Loop + Check Gauge
- Cast On and Work Neck Ribbing
- Work Body Increases
- Bind Off for Leg Openings
- Cast On to Finish Leg Openings
- Weave in Your Ends Now
- Continue Knitting the Body
- Decrease for Back
- Work Body Ribbing
- Work Leg Ribbing and Finish
Most sock patterns are very hard for beginners, especially if they are written for double-pointed needles.
Our class teaches you the easiest techniques using Magic Loop. You will knit a simple pair of worsted-weight toe-up socks that fit great.
Contents
- Walk-Through of Toe-Up Sock
- Check Your Gauge in the Round
- Judy’s Magic Cast-On (JMCO)
- Cast On for Both Socks
- Stop Losing Cast-On Stitches
- Bottom Needle/Back Needle
- Fix a Loose Toe-Up Cast-On
- Increases on Toe-Up Socks
- M1L and M1R Increases
- Easier KFB Instead of M1R
- Read Your Work for Increases
- Keep Yarn from Tangling
- Avoiding Gaps and Ladders
- Socks Not Joined On One Side
- Removing Socks to Unravel + Fix
- Start Fleegle Heel Increases
- Estimate Fleegle Heel Using Shoe Size
- Turn the Fleegle Heel
- How to Purl Backwards
- Final Decreases on Fleegle Heel
- Invisible Ribbed Bind-Off
- Jeny’s Surprisingly Stretchy Bind-Off
- Weave in Ends
Bonus videos
- Faux Heel Flap for Toe-Up Socks
- Slip-Stitch Heel Pattern
- Eye-of-the-Partridge Stitch
Top-down socks have several complex parts.
Learn to knit a pair of top-down fingering-weight socks with our simple Magic Loop pattern so that you can knit even advanced socks with confidence.
Contents
- Top-Down Socks Walk-Through
- Two-at-a-Time Cast-On
- Knit 1st Round
- Optional Lace Pattern
- Keep Yarn from Tangling
- Avoiding Gaps and Ladders
- Socks Not Joined On One Side
- Knit the Heel Flap
- Slip-Stitch Heel Pattern
- Eye-of-the-Partridge Stitch
- Turn the Heel
- How to Purl Backwards
- Pick Up Stitches Along Heel Flap
- Shape Gusset
- Kitchener Stitch
- Weave in Ends on Socks
- How to Block Your Work
One-and-two-color Brioche knitting is beautiful but can be intimidating.
We teach you every tip and trick so that knitting Brioche feels like second nature. Practice on a gorgeous scarf and hat.
Contents
- Basic One-Color Brioche Stitch
- Read Your Work in Brioche
- How to Count Stitches and Rows
- Setup for a Standard Bind-Off
- Stretchy Yarnover Bind-Off
- Weaving in Ends on Brioche
- What is Selvedge-Stitch Brioche?
- Italian Cast-On + Tubular Setup
- One-Color Selvedge Brioche
- Italian Bind-Off
- One-Color Brioche in the Round
- Two-Color Brioche in the Round
- Read Work on 2-Color Brioche
- Decreasing: the Brioche SSK
- Two-Color Flat Selvedge Brioche
- Tips for Two-Color Flat Brioche
- Fixing Mistakes in Brioche
Charts allow you to knit complex patterns easily, but their symbols and rules can be confusing.
We teach you knit-and-purl, lace, cable, Fair-Isle, Intarsia, double knitting, duplicate stitch, and Mosaic charts so that you can approach any charted pattern, and any of the above projects, with confidence.
Contents
Knit and Purl Charts
- Basic Checkerboard
- Textured Stripes
- Bricks
- Swan
Lace Charts
- Lace Zigzag + Put in a Lifeline
- Lace Diamond
- Foliage Toddler Hat
- Starlight Lace in the Round
Colorwork Charts
- Fair Isle Charts
- Double Knitting Charts
- Intarsia Charts
- Duplicate Stitch
- Mosaic Charts
Cable Charts
- Simple Cable Charts
- Complex Cable Charts
Two-sided knitting involves specific new knitting techniques.
Master double knitting from a chart so that even complex projects, like the above, are doable.
You’ll learn by making a chunky heart or checkerboard scarf.
Contents
- Pattern Walk-Through
- How to Read a Chart
- Cast-On for Double Knitting
- Set-Up for Double Knitting
- Double-Knit Plain Stitches
- Practice: Rows 3-4
- Keep Your Edges Clean
- Double Knit a Charted Design
- Keep Track on Double Knitting
- Practicing the Charted Design
- How to Undo Stitches
- If You Don’t Move Both Yarns
- Fixing a Mistake Far Down
- Completely Remove a Few Rows
- Keep Your Yarn from Twisting
- Adding a New Ball of Yarn
- How to Double-Knit Faster
- How to Bind Off
- How to Weave In Ends
Grab 2, 3, or more colors of yarn because you’re ready to knit Fair-Isle.
Fair-Isle tension can be tricky, so we walk you through it whether you’re an American, Continental, or dual-style knitter.
Practice on a fun and easy felted bag.
Contents
Beginner: Fair-Isle Felted Bag
- Pattern Walkthrough
- Knitting the Base of the Bag
- Join Color B
- Knit the Striped Bag Bottom
- Pick Up + Knit Around Base
- Begin Knitting in the Round
- Learn to Read a Chart
- Begin Fair-Isle Knitting
- Messed Up Following the Chart
- Maintain Tension
- Pulling Floats Too Tight
- Fix Mistakes Far Down
- Switch Colors Consistently
- Prevent Long Floats
- Avoid Corners on Magic Loop
- Garter Stitch in the Round
- Final Rounds
- Weave in Ends
- I-Cord Handles
- Assemble Bag
Intermediate and Advanced Fair-Isle
- Flat Fair-Isle (Back-and-Forth)
- 3-Color Fair-Isle
- Fair-Isle Ribbing
- Ladder-Back Jacquard
Cat Bordhi created the popular infinity-loop knitting style called Moebius Knitting.
Get comfortable knitting any moebius project out there by creating a gorgeous decorative felted bowl.
Contents
- Materials
- Moebius Cast On
- Creating 5 Twists
- Round 1
- Round 2
- I-Cord Bind-Off
- Weave in Ends
- Prepare Folds
- Pick Up and Knit
- Increase Round
- Decreases
- Decrease Tricks
- Finishing
Learn to knit charted lace in the round, fix mistakes on any kind of lace pattern, and knit a beautiful hat you will be proud of.
Contents
- Pattern Overview
- Learn Magic Loop
- Check Your Gauge
- Cast-On and Round 1
- Work Rounds 2-3
- Crown – Rounds 1-2
- Crown – Rounds 3-4
- Counting Chart Stitches
- Crown – Round 5
- Pattern Round or Plain Round?
- Fixing Mistakes 1
- Crown – Round 9
- Crown – Round 7
- Crown – Round 11
- Fixing Mistakes 2
- Remove Stitches Back to Lifeline
- How to Put in a Lifeline
- Crown – Round 13
- Crown – Round 15
- Fixing Extreme Mistakes
- Loop of Magic Loop Comes Out
- Forgot a Yarnover
- Decrease Round
- Leaf Lace – Rounds 1-2
- Leaf Lace – Round 3
- Leaf Lace – Round 5
- Dropped Yarnovers
- Leaf Lace – Round 7
- Leaf Lace – Round 11
- Leaf Lace – Round 9
- Fixing Mistakes 3
- Work in Ribbing
- Jeny’s Surprisingly Stretchy Bind-Off
- Invisible Ribbed Bind-Off
- Weave In Ends
Normal thumb construction makes your first mittens a challenge.
Learn the world’s best mitten thumb plus the two-at-a-time-on-Magic-Loop technique to create a pair of perfect-fitting bulky mittens that you can knit in one day.
Contents
- Bulky Mittens Pattern Overview
- Two-at-a-Time Cast-On
- Twisted Rib Cuff
- Work in Twisted Rib
- Count Cuff Rounds Easily
- Keep Yarn from Tangling
- Work One Round Even
- Increase for the Hand
- Increase for the Thumb
- Slip Markers As You Increase
- Continue Increasing for Thumb
- Tell If It’s Time to Increase
- Remove Thumb Stitches
- Knit the Hand
- Count Your Rounds Easily
- Decrease for Top of Hand
- Count Subsequent Rounds
- Finish Hand Decreases
- Finish Top of the Hand
- Place Thumb Stitches on Needle
- Pick Up + Knit Across Gap
- Knit Thumb
- Weave in Ends on Mittens
- Bonus: Ultimate Mitten Thumb
Using the same standard bind-off for every project can make your knits look lackluster.
For a professional finish, select a recommended bind-off for each type of project from over 45+ bind-offs.
Contents
Bind-Off Tips and Tricks
- Matching Cast-Ons + Bind-Offs
- Neaten Last Stitch: Flat Knitting
- Neaten Last Stitch in the Round
- Count Bound-Off Stitches
- Undo Your Bind-Off Stitches
Bind-Offs for Stockinette
- Standard Bind-Off
- Suspended Bind-Off (Variation)
- Decrease Bind-Off
- Crochet Bind-Off
- Elastic Bind-Off
- Braided Rib Bind-Off
- EZ Sewn Bind-Off
Bind-Offs for Garter Stitch
- Icelandic Bind-Off
- Chinese Waitress Bind-Off
Stretchy Bind-Offs/Bind-Offs for Ribbing
- In-Pattern Bind-Off for 1×1 Rib
- Jeny’s Surprisingly Stretchy Bind-Off (JSSBO): 1×1 Rib
- Jeny’s Surprisingly Stretchy Bind-Off (JSSBO): 2×2 Rib
- Yarnover Bind-Off
- Latvian Bind-Off
- Invisible Ribbed Bind-Off: 1×1 Rib
- Tubular Bind-Off for 1×1 Rib
- Kitchener Double-Rib Bind-Off
- Cable Bind-Off for 1×1 Rib
- Cable Bind-Off for 2×2 Rib
Bind-Offs for Lace
- Frilled Standard Bind-Off
- Jeny’s Surprisingly Stretchy Bind-Off (JSSBO)
Decorative Bind-Offs
- Knit 2 Together Bind-Off
- I-Cord Bind-Off
- Edging Bind-Off
- Hemmed Edge Bind-Off: Purl + Picot
- Frilled Standard Bind-Off
- Frilled Decrease Bind-Off
- Ruffle Bind-Off
- Picot Point Bind-Off #1
- Picot Point Bind-Off #2
- Picot Chain Bind-Off
Seaming Bind-Offs
- Russian Grafting
- Japanese Bind-Off
- ZigZag (Ancient Greek) Bind-Off
- Three-Needle Bind-Off
- Three-Needle I-Cord Bind-Off
- Kitchener Stitch Without Fear
- Kitchener Stitch for Garter Stitch
Other Bind-Offs
- Without-Knitting Bind-Off
- 1-Over-2 (Gathered) Bind-Off
- Cable Bind-Off for Seed Stitch
- Simple Two-Color Bind-Off
- Double-Stitch Bind-Off
- Sloped Bind-Off
- Tulips Buttonhole
Using just one or two cast-ons can make your projects look homemade, not professional.
Learn 40 unique ways to start your knitted projects, with stretchy cast-ons, invisible cast-ons, center-start cast-ons, and more.
Contents
Cast-On Basics
- Estimating Tail Needed
- How to Make a Slipknot
- Casting On Without a Slipknot
- Slingshot Position
Cast-On Tips and Tricks
- Casting Onto Two Needles
- The Infinite-Tail Method
- Count Cast-On Stitches Fast
- Adding More Stitches at the Endl
- Fixing a Dropped Cast-On Stitch
- Cast-On Too Tight or Too Loose
Long-Tail Cast-Ons
- The Long-Tail Cast-On
- Long-Tail Cast-On – Thumb
- Old Norwegian (Twisted German) Cast-On
- Chain (Crochet) Cast-On
Short-Tail Cast-Ons
- Backwards Loop Cast-On
- Cable Cast-On
- Double-Twist Loop Cast-On
- Grandma’s Cast-On
- Knitted Cast-On
- Purled Cast-On
Stretchy/Ribbed Cast-Ons
- Alternating Cable Cast-On
- Alternating Long-Tail Cast-On
- Alternating Old Norwegian (Twisted German) Cast-On
- Channel Island Cast-On
- Chinese Waitress Cast-On
- Double-Start Cast-On
- Slipknot Cast-On
- Tillybuddy’s Cast-On
Invisible Ribbed Cast-Ons
- Italian Tubular for 1×1 Rib
- Italian Tubular for 2×2 Rib
Center-Start Cast-Ons
- Emily Ocker’s Circular Cast-On
- Invisible Circular Cast-On
- Garter Tab Cast-On
Decorative Cast-Ons
- Lace Cast-On
- Picot Cast-On
- Hemmed Edge: Purl + Picot
- I-Cord Cast-On
Double-Sided Cast-Ons
- Judy’s Magic Cast-On (JMCO)
- JMCO for two-at-a-Time
- Turkish Cast-On
- Figure-8 Cast-On
Color Cast-Ons
- Contrasting-Color Cast-On
- Two-Color Cast-On
- Three-Color Cast-On
- Twined Cast-On for 2-Color Rib
Provisional Cast-Ons
- Provisional Cast-On
- Crochet Provisional Cast-On
Special Shapes
- Moebius Cast-On
- Two-at-a-Time Cast-On
If you haven’t crocheted in a while (or ever), you’ll need a quick-reference dictionary of crochet stitches in order to follow any pattern.
Videos and GIFs teach and quickly remind you of each technique.
Contents
- BLO – Back loop only
- CH – Chain stitch | GIF
- DC – Double crochet
- HDC – Half-double crochet
- SC – Single crochet | GIF
- SL ST – Slip stitch
- TR – Triple crochet
- British Crochet Terms
Baffled by an abbreviation in your pattern? Video demos of 30+ abbreviations help you knit any pattern correctly and easily.
Contents
- 1×1 Rib/2×2 Rib – Ribbing
- BLCO – Backwards Loop Cast-On
- BO – Bind Off
- BO in Pattern
- Garter St – Garter Stitch
- K – Knit Stitch – American
- K – Knit Stitch – Continental
- K2TOG – Knit 2 Together
- K2TOGTBL – K2TOG Through the Back Loops
- KFB – Knit Front and Back
- Kitchener Stitch
- Long-Tail Cast-On
- Mattress Stitch
- M1/M1L – Make One Left
- M1R – Make One Right
- P – Purl Stitch – American
- P – Purl Stitch – Continental
- P2TOG – Purl 2 Together
- PFB – Purl Front and Back
- P/u (Pu) + K – Pick up and Knit
- Recognizing Knit + Purl Stitches
- S2KP – Slip 2, Knit, Pass
- SKP – Slip, Knit, Pass
- Sl – Slip 1
- SSK – Slip, Slip, Knit
- St St – Stockinette Stitch
- TBL – Through the Back Loop
- W&T – Wrap and Turn
- Weave in Ends
- Work Even
- YO – Yarnover
Knitting lingo can be confusing.
We define and illustrate over 80 knitting and yarn terms so that you can keep up with any pattern or discussion.
Contents
- Accidental Yarnover
- American/English-Style Knitting
- Aran
- Back Loop
- Beginning of Round
- Bind Off
- Blocking
- Bobbin
- Cast On
- Center-Pull Ball
- Chunky
- Circs/Circulars
- Circular Needles
- Colorway
- Colorwork
- Continental Knitting
- Contrasting Color
- Decrease
- DK
- Double-Pointed Needles
- DPN(s)
- Dye Lot
- Felting
- Fingering
- Flat Knitting
- Frogging
- Garter Stitch
- Gauge
- Gauge Swatch
- Getting Gauge
- Grabby
- Hank
- Heathered
- Highly Variegated
- In Pattern
- In the Round
- Increase
- Kettle-Dyed
- Knit Up (Verb)
- Knitting Flat
- Knitting Pattern
- Knitwise
- Lace
- Leg
- Local Yarn Store
- LYS
- Magic Loop
- Main Color
- Mosaic Knitting
- Multiple (Noun)
- Pull From the Center
- Pull From the Outside
- Purlwise
- Read Your Work
- Reverse Stockinette Stitch
- Ribbing
- Right Side
- Round (Noun)
- Round Knitting
- Self-Striping
- Semi-Solid
- Short-Tail Cast-On
- Skein
- Sport
- Stash
- Stitch
- Stockinette Stitch
- Straight Needles
- Super-Bulky
- Swatch
- Tail
- Tension (Verb and Noun)
- Tink
- Turn Work
- Variegated
- Weave In
- Weight
- Work Even
- Working Yarn
- Worsted
- Wrap
- Wrong Side
- Yardage
- Yarnover
When you’re just starting out it’s hard to know which supplies are essential and which are nice-to-have.
Our list of recommended supplies will help you choose yarn, needles, project bags, and notions for every budget.
Contents
Books
- A Treasury of Knitting Patterns
- Complete Idiot’s Guide to Knitting and Crocheting
- Custom Knits
- Handknit Holidays
- Harmony Guides: Knit & Purl
- Harmony Guides: Lace & Eyelets
- Knitting Brioche
- Knitting on the Edge
- Mosaic Knitting
- Son of Stitch ‘n Bitch
- Stitch ‘n Bitch Crochet – The Happy Hooker
- Stitch ‘n Bitch Nation
- Stitch ‘n Bitch: The Knitter’s Handbook
- The Knitter’s Book of Yarn
- The Magic Loop
Fabric Care
- Blocking Mats and T-Pins
- Soak Wash
- Sock Blockers
- Sweater Shavers
Needles
- 10-Inch Rosewood Needles
- 10-Inch Signature Needles
- Addi Turbos
- Size 10 Birch Needles
Notions
- Ball Winder
- Cable Needles
- Crochet Hooks
- Embroidery Scissors
- Fabric (Puffy) Paint
- Kitchen Scale
- Knit Chek Gauge-Checker
- Knitting Needle Case
- Needle-Felting Needles
- Needle-Felting Pad
- Notions Case
- Pompom Maker
- Stitch Markers – Locking
- Stitch Markers – Split Ring
- Suede Slipper Bottoms
- Swift
- Tape Measure
- Tapestry Needles
Yarn
- Hand Dyed Bulky
- Malabrigo Chunky
- Malabrigo Rasta
- Malabrigo Twist
- Walkabout Yarn
- Wool-Ease Thick n’ Quick Yarn
Remind yourself about yarn weights, needle sizes, and gauge with our handy guides..
Contents
- US-Metric Needle Conversion
- Yarn Weights, Needles + Gauge
- Yarn Weights: Actual Size
- Yarn Weights: Photo Glossary
