“Become A Knitting Superstar” Premium Video Knitting Library > Double-Knitting
Double-Knitting
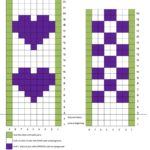
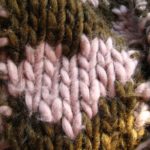

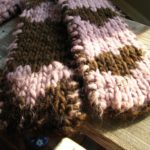
Table of Contents
Super-Bulky Double-Knit Scarf
- Pattern Overview/Project Walk-Through
- How to Read a Double-Knitting Chart
- Pattern: Double-Knit Heart/Checkerboard Scarf
Cast-On and Setup for Double Knitting
Double Knitting From a Chart
- How to Double Knit – Plain Stitches
- Practice Double Knitting Plain Stitches
- How to Double Knit – Charted Designs
- Practice Double-Knitting Charted Designs
Double Knitting Tips and Tricks
- Keep Your Edges Even
- Keeping Track of Where You Are in the Row
- Keeping Your Yarn From Twisting
- Join a New Ball of Yarn
- Double-Knit Really Fast
Fixing Mistakes in Double Knitting
- Undo Stitches in Double Knitting
- What Happens When You Don’t Move Both Yarns
- Fixing a Mistake Several Rows Down by Dropping the Stitch Down
- Completely Taking Out Multiple Rows
Finishing
Appendix
Double-Knitting for Dummies
What Is Double-Knitting?

Double-knitting is an intermediate-to-advanced technique that combines a little finger dexterity with the ability to read knitting charts.
Using two colors at once in a unique way, double knitting allows you to make reversible designs like this gorgeous scarf “Honka” from Eeva Saviranta.
If you can knit and purl, then you can double-knit.
I will walk you through every step, from understanding how to read charts and use them to make designs, to what to do when you mess up (which I hope you do).
I know that when you challenge yourself, you will make mistakes, and that’s how we get better at knitting. So, as in every KnitFreedom tutorial, there is a full troubleshooting section.
How This Course Works
We’ll learn to double-knit using a simple heart-shaped chart, that will create a fun design that is really easy.
We’ll use really thick yarn so that the project goes super-fast. You can also work along with the checkerboard chart included in the pattern.
I recommend that you at least do the first 6 rows of the Heart Scarf along with the videos first to practice, and then up to Row 10 on the Heart Chart on your own.
Please read through the whole course, or at least a few sections ahead, before beginning. The reason for this is that I have included troubleshooting videos and I want you to be aware of where they are if you get stuck.
Materials Needed
 Pattern: Download Double-Knit Heart/Checkerboard Scarf pattern here.
Yarn: 120 yards super-bulky yarn in each of two colors (MC and CC).
Shown at top of page:
- Purple scarf: Blue Sky Alpacas Bulky in 1221 (Boysenberry) and 1213 (Jasmine).
- Pink and brown scarf: Brown Sheep Burly Spun in Sable and Twinkle Handknits Soft Chunky in Powder.
Needles: US size 15 straight needles.
Notions: Scissors, tapestry needle
Pattern Walk-Through
Here’s a video overview of what to expect while working through this project.

Double Knitting – Pattern Walk-Through
How to Read a Chart
Make sure you’re looking at the Heart and Checkerboard Chart, follow along with the first video to understand how to read a chart.
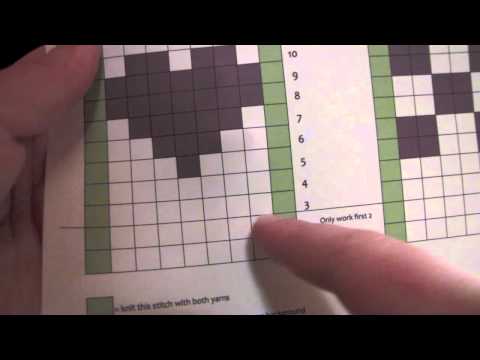
Double Knitting – Reading the Chart
Cast On
There is a special way to cast on for double-knitting that makes it easy to knit with both colors at once.

Double Knitting – Cast On
Set-Up Row for Double Knitting (Row 1)
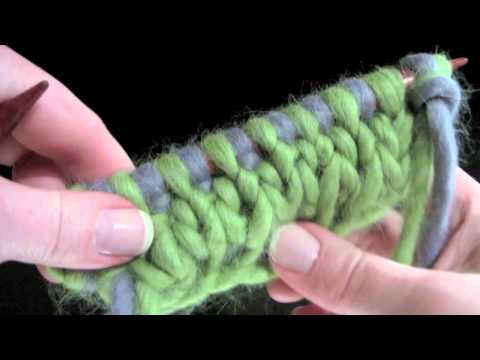
The first row of a double-knitting project is a set-up row in which we incorporate both colors for the first time.
This technique uses knits and purls to alternate colors, placing a stitch of one color on the front, and a stitch of the opposite color on the back. If it seems a little fiddly, it is – but you only have to do it once.
Besides, if you mess up, you can start again without losing much work.

Double Knitting – Set-Up Row (Row 1)
How to Double Knit – Plain Stitches (Row 2)
The best way to get used to the alternating-color technique is to work along the chart, practicing creating stitches of one color on the front, and the other color on the back.
As we will see, each stitch in the scarf, except for the edge stitches, is really a pair of stitches: the first stitch of the pair is knitted and shows up on the front of the scarf, and the second stitch of the pair is purled in the opposite color and shows up on the back of the scarf.
The only exception to this is that a single stitch on either side is knitted with both yarns together.

Double Knitting – First Row (Row 2)
Following the chart, there are 4 rows of “plain” double-knitting: knitting in which the front of the scarf is worked in the main color, and the back is worked in the contrasting color.
We’ve already done two rows: work along with me as we do the next two.
Practice Double Knitting (Rows 3-4)
Double Knitting – Rows 3 and 4
Keep Your Edges Clean
To make sure your edges look beautiful, always make sure your edge stitches are not twisted:

Double Knitting – How to Make a Nice Edge
How to Double Knit – Charted Design (Rows 5-6)
Now we come to the first area of the chart that incorporates the contrasting color on the front of the chart. Here’s how to start creating the design in the chart. Remember to highlight each row so you don’t get lost.

Double Knitting – Creating a Design using the Chart (Rows 5 and 6)
Keeping Track of Where You Are
When you are just beginning, it is easy to lose track of where you are in the row. The good thing is, you can just count pairs, starting at the beginning of the row, and follow along with the chart, as I show in the next video.

Double Knitting – Keeping Track Of Where You Are In The Row
Practice Double-Knitting a Charted Design (Rows 7-8)
Let’s continue practicing working a chart with both light and dark spaces.
Work along with me as we do the next two rows. Remember, never look at the color of the stitch on your needle, just notice whether it is a knit or purl stitch.
Then, look at your chart to see if the stitch is the main background color (a light square) or the opposite color (a dark square).

Double Knitting – More Chart Practice (Rows 7 and 8)
Continue to follow the chart. When you reach the top of the chart, go back and start again from Row 5. If you run into trouble, watch the videos in the next section.
Heart Scarf Only (Not Checkerboard Chart)
When you are halfway through the scarf (approx. 3-3.5 feet, or at least 4 or 5 heart motifs), turn the chart upside down and work the second half of the scarf according to the upside-down chart.
This ensures that the hearts will be right-side up on both halves of the scarf.
Troubleshooting
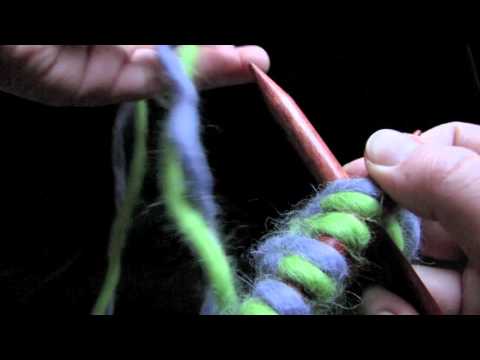
How to Undo Stitches on Double Knitting
The most common mistake that happens during double-knitting is when you work both stitches in a pair using the same yarn. Here’s how to discover and fix it, if your mistake is in the row you are knitting.
If your mistake is a few rows down, the videos below will guide you through fixing them.

Double Knitting – How To Undo Stitches
When You Don’t Move Both Yarns
If you forget to move both yarns to the front and the back together, you’ll get a bar across one stitch on one side of your knitting.
Here’s how to recognize it.

Double Knitting – Move Both Yarns Or Else
To fix this mistake, you’ll have to remove a few rows of knitting. The two videos below show you how to undo your double-knitting one or even several rows down to fix a stitch.
Fixing a Mistake Several Rows Down

Double Knitting – Fixing A Mistake A Few Rows Down
Completely Taking Out A Few Rows
If you need to completely undo a few rows, here’s how to remove your needle and take out a few rows, then replace your stitches correctly.

Double Knitting – How To Take Out Multiple Rows
Expert Tips
Here are even more tips to help your double-knit project come out amazing.
How to Keep Your Yarn From Twisting
To keep your balls of yarn from twisting while you knit and adding funny lumps to your design, watch this video.

Double Knitting – Keep Your Yarn From Twisting
Joining a New Ball of Yarn
When you run out of yarn, here’s how to add a new ball:
Double Knitting – Joining A New Ball Of Yarn
Double-Knit Faster
Once you really get the hang of things, it’s time to start double-knitting faster.
This video shows how you can use your fingers and needles to go smokin’ fast on this project.

KNITFreedom – Double Knitting – How To Double-Knit Really Fast
Bind-Off
When you come to the end of the scarf, you’ll want to bind off in a way that matches the lovely cast-on you did.
We’ll accomplish this by knitting the paired stitches together using only the main color, and then binding them off in the usual way.

Double Knitting – Bind Off
Weave in Your Ends Invisibly
Now, cut your yarn, leaving at least a six-inch tail, and weave in your ends, making sure to disguise the tails completely so they don’t pop out later.

Double Knitting – Weaving in Ends
Block Your Scarf
 You may block your scarf if you choose – blocking is helpful for disguising any flubs in tension that may have happened, and for straightening the edges of your scarf.
It also helps the yarn relax into its new shape. It can’t hurt to block all of your projects – it gives a finished look to them. Soak your scarf in lukewarm water with a little wool wash (available at your LYS) for at least 20 minutes.
Press the scarf in a towel and lay it out to dry, straightening the edges with your fingertips. Note: because the scarf is double-thick, it may take longer to dry than usual. You’re done!
All that remains is to wear and be fabulous.
Appendix: Heart and Checkerboard Charts
